A 303 HTTP status code redirects users to a new URL using a GET request.
It is typically used after a form submission (POST) to guide users to a confirmation page.
In simple terms, a 303 redirect, also known as “See Other”, tells a browser, “You’re done here; check out this other page.”
If you reload or resubmit a page after submitting a form, you might see a warning message like this.
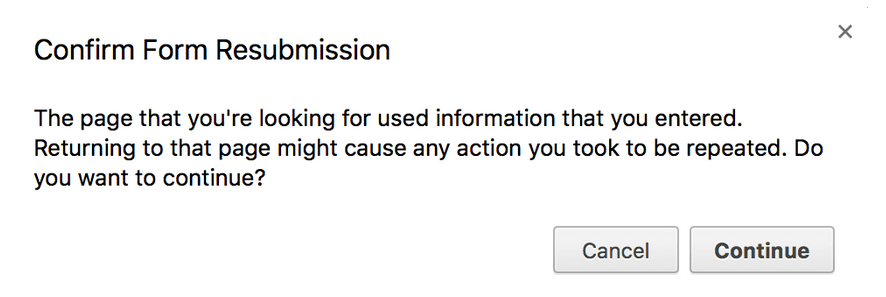
It is a warning that if you refresh the page, the form will be submitted again, and any action taken on the server might be repeated.
Let’s delve into the problem.
The form uses the POST method. Upon receiving the POST, the server saves the new data to the database and returns an order confirmation page. All as part of the same request.
Next, the user reloads the webpage.
This re-submits the identical data to the server, saving it again to the database.
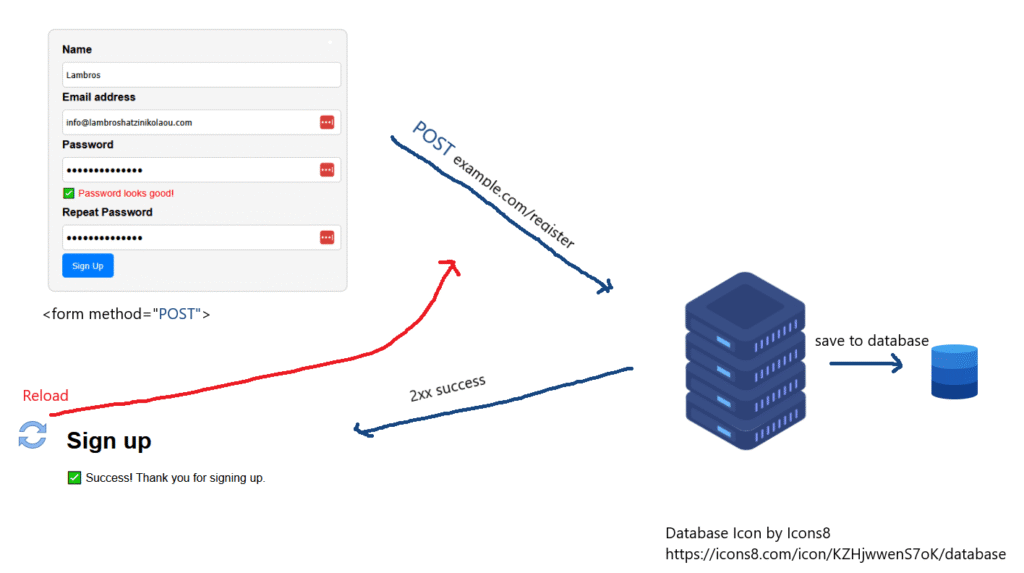
The solution to this problem is to use a 303 redirect.
The server receives the data to the database using the POST method, BUT then redirects the user to a separate confirmation page which the browser loads using the GET method.
Now, if the user reloads the page, it wont resubmit the same data to the server since it is now part of a new request.

So by using a redirect to another page immediately after a successful form submission achieved with the POST method, we can avoid resubmitting the same data to the server and getting a warning message.
Let’s see it in action:

What the screenshot shows:
- POST /create → 303 See Other
- We submitted a form to /create (registration form).
- The server responded with a 303 See Other redirect to another page (standard practice after POST to prevent resubmission on refresh).
- GET /success → 200 OK
- The browser followed the redirect and successfully loaded the /success page.
- This page shows the confirmation message (Thank you for signing up.)
How Do You Implement a 303 Redirect?
Setting up a 303 redirect in PHP is easy.
After processing a form, you send a 303 status code with a Location header to point to the new URL.
Here’s a practical example:
Let’s break this code down.
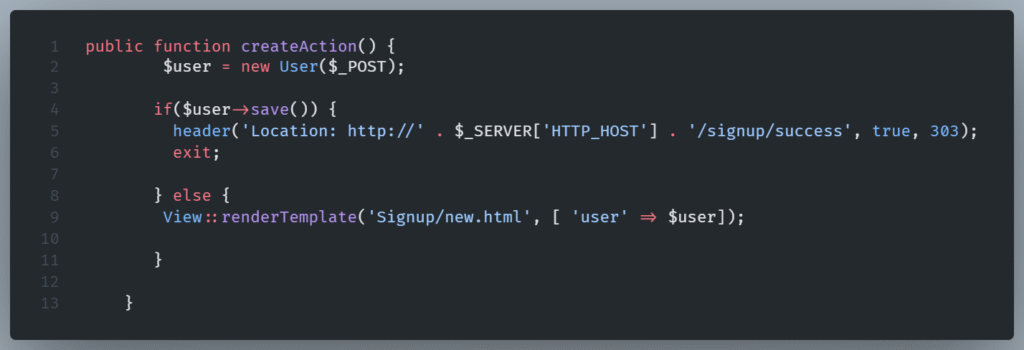
The createAction() function handles form submissions for user sign-ups.
First, we create new User object using form data submitted via POST.
In the lines 4-7 we try to save the user to the database.
A 303 See Other redirect to /signup/success is being performed.
The $_SERVER[‘HTTP_HOST’] ensures the redirect goes to the current domain (e.g., localhost:8080).
The true parameter ensures the redirect replaces the current response, and 303 sets the status code.
Finally exit; ensures the script halts after the redirect . This is important to avoid further processing.
If user saving fails on lines 8-10 (due to validation, etc.), the signup page is re-rendered.
This passes the $user object (containing error messages or/and form values) back to the view.
Wrapping Up
Using a 303 redirect makes your websites feel polished and user-friendly.
A 303 redirect, although not flawless, prevents annoying errors, like double-charging a credit card from a form resubmission.
As you work with forms in the future, evaluate the potential benefits of a 303 redirect for polished processing because building a better user-experience is what coding is all about.